- SIP Server address (sometimes called SIP Proxy)
- SIP User ID (in most cases this is the phone number)
- The password for the SIP account
To obtain these settings, you must contact Freephoneline and ask for your configuration file. There's a one time charge for this, currently $50 CAD + tax. They will send you a Word document with the settings.
Connect all the cables: power cord, an ethernet cable from your router (or modem) to the WAN port of the HT502, an ethernet cable from the LAN port to your PC and a phone to the Phone 1 port. Open a web browser and type in http://192.168.2.1. The login page will come up, enter admin to log in then click Advanced Settings:
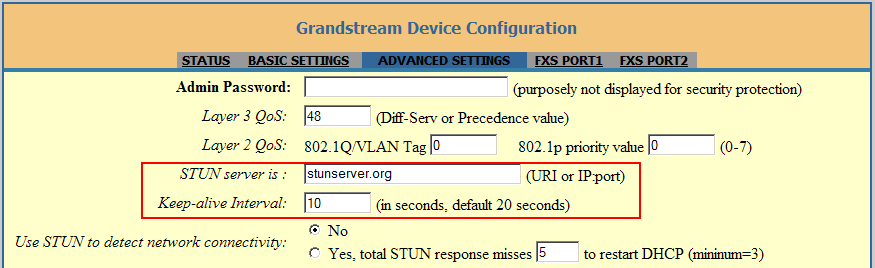
Change the following settings:
- STUN server is: enter the host name or IP address of a publicly available STUN server, such as stunserver.org
- Keep-alive interval: change to 10
Click Update at the bottom of the page, but don't reboot yet. Click FXS Port1 to configure the settings for the Line 1.
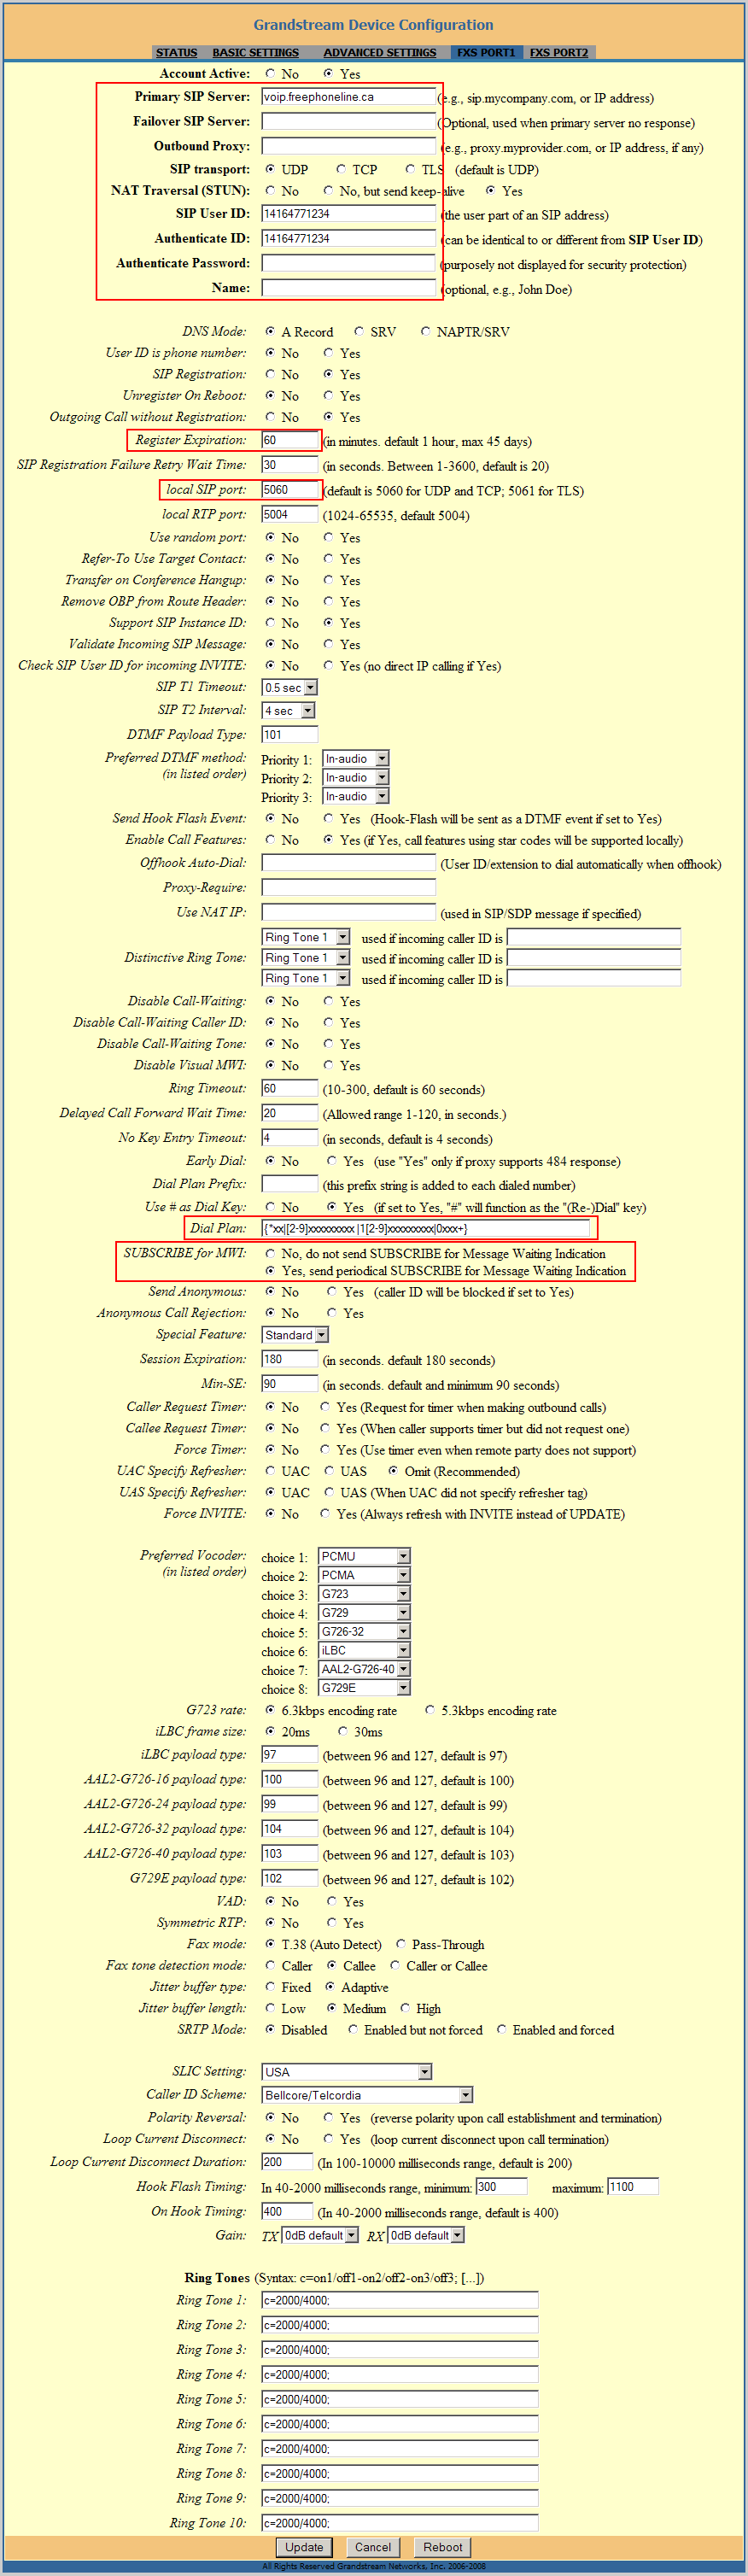
Enter the following settings:
- Primary SIP Server: voip.freephoneline.ca (if you have one way audio issues, try also voip3.freephoneline.ca)
- Failover SIP Server: leave blank
- Outbound proxy: leave blank
- NAT Transversal (STUN): change to Yes
- SIP User ID: enter your Freephoneline number, with "1" in front, for example 14164771234
- Authenticate ID: same as the SIP User ID
- Authenticate Password: the SIP password for your Freephoneline account
- Name: you can leave it blank or enter your name here (note that this does not change the Caller ID)
- Register Expiration: change to 60 minutes
- (optional) Local SIP port: the default value is 5060. If you have other VoIP adapters in your LAN, or computers running softphones, you may have to change this to a value between 5060-5069 in order to avoid conflicts
- Dial Plan: copy/paste to the following string
{*xx|[2-9]xxxxxxxxx|1[2-9]xxxxxxxxx|0xxx+}
- SUBSCRIBE for MWI: set to Yes
Scroll down to the bottom of the page and click Update. You will be prompted to reboot the adapter. Please allow it to reboot in order to start with the new settings.
Once the adapter has come up, login back to the web settings and click the Status page. A page similar to the one below will come up.
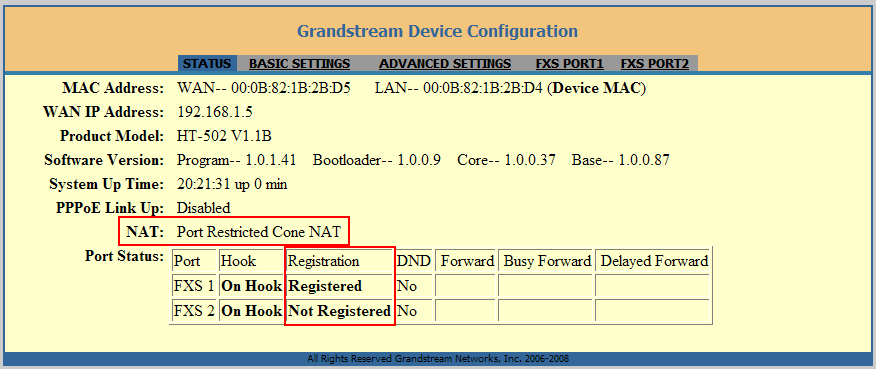
Check the status for Registration under the port FXS1. If it shows Registered then you're ready to place and receive calls. If it shows Not Registered, wait 20-30 seconds then refresh the page. Do this a few times. If it still can't register after 3-4 retries, try changing the Local SIP port as described earlier. Also check the value for NAT. If it shows Symmetric NAT, go back to the FXS Port1 page and set the NAT Transversal (STUN) to No, but send keep-alive.
To factory reset the adapter
Restoring the Factory Default settings:
- find the MAC Address of the device. It is a 12 digits HEX number located on the bottom of the unit (can also be found under the Status page).
- encode the MAC address: keep the numbers as they are, and replace any of the alpha characters like below
A: 22
B: 222
C: 2222
D: 33
E: 333
F: 3333
For example, if the MAC address is 000b8200e395, it should be encoded as 0002228200333395
- pick up the phone and dial *** (three times the * key). When you hear the voice prompts, dial 99. The adaptor will say "reset" after which you can start entering the mac address encoded as above. After the last digit of the MAC address has been entereed, the adapter will factory reset and reboot.